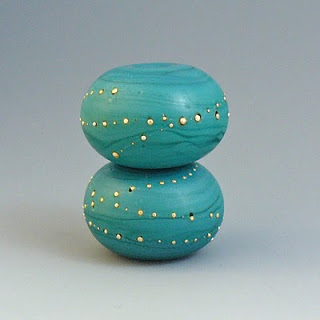
 These look nice together- totally by accident that I put that strand of encased crackled beads together and after setting them next to the hollows noticed how nice they look together..hmm, I can see a new set in the future w/ a mix of matte and encased beads.
aja vaz


 These will be going up shortly on
Going up Tomorrow on Etsy
ETA in Etsy shop —> after breakfast, before laundry 🙂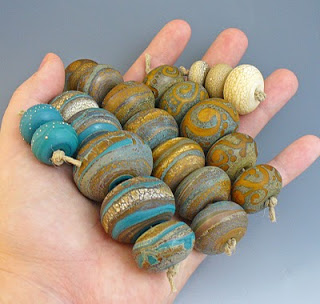


Etsy Update!
Finally getting around to re-opening my shop and putting up new work. These are smaller hollows than what I normally make- so if you like them snag them, because I didn’t make many.
These will be listed shortly:


Work, work, work
Trying to get the time to get all these listed is causing me a headache. About to head out of town for an appt. that will take most of the afternoon. Maybe tomorrow?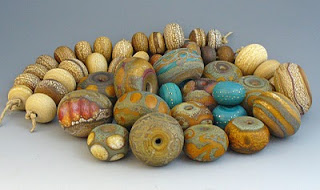
 Argh, and all of these still need to be etched and photographed..maybe the in-laws won’t notice me slipping off while they admire the little man this next week?
 And a closeup of a favorite bead.. still trying to figure out which color of coral it was.
 Pagoda Ring Class
The Pagoda Ring class at Ornamentea was great and especially nice since it was just me and one other student- which made it possible to pick our instructor’s brain. Ndidi was a great teacher and we learned how to etch, something I’ve been wanting to learn to do for years now and it’s so simple! There are a couple things safety-wise I might change, like the ventilation and wearing an apron, etc.


The leaf disc is Copprclay, not etched. For some reason my Copprclay hasn’t wanted to sinter properly..not sure what the problem is, but planning on opening a new packet and will see if that makes a difference.  A handy trick using tubing as a riser- got to use a tube jig for the first time and must say it’s pretty handy. Which reminds me that I need to get over my fear of the saw from HF and use it for things like this.
  Got lots of compliments for the texture on this ring, reminds me of tooled leather. Still need to do some finishing touches, like filing and cutting the extra length on my fastener.
A handy trick using tubing as a riser- got to use a tube jig for the first time and must say it’s pretty handy. Which reminds me that I need to get over my fear of the saw from HF and use it for things like this. Got lots of compliments for the texture on this ring, reminds me of tooled leather. Still need to do some finishing touches, like filing and cutting the extra length on my fastener. 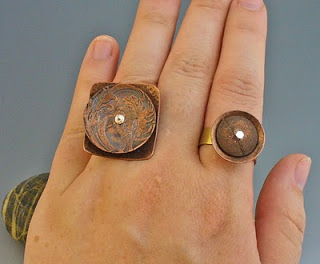 Stayed tuned for etched bead caps and new work soon. Planning on re-opening my Etsy shop sometime this week, just have a whole lotta work to photograph.
Closer to Fine
It was an Indigo Girls’ kind of day today and my space is almost finished- now the finishing touches such as putting my glass in its place and hooking up my equipment, etc. need to be done. Behold my fabulous new work space:

 I’ll be sure to get more photos of everything in its place by Monday- after some torching, of course. Have a creative weekend!
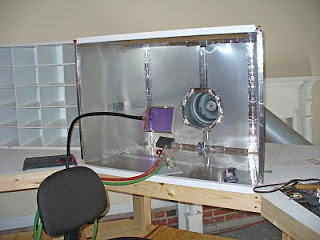
Progress w/ Garage Studio
The studio is coming along- the table is done and next comes the ventilation box and set-up. Things were changed midway, as many projects are. We had talked about switching the back door to one w/ a doggy door and using that as our vent, but I decided we use that door too often to have it stay shut. Instead the vent will run outside when I crack the garage door open and the make-up air will be the back door (the one in the garage, not the main house).
 Now to get ready for my son’s doctor appt. an hour away..maybe by this time tomorrow I’ll get my torch set up!
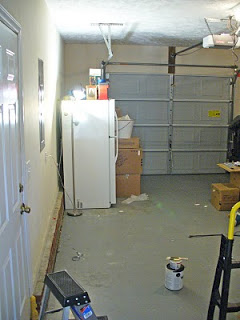
Garage Studio..Part I
First pics of future garage studio space. Planning to refresh the paint on the walls today and try and clean up around the space a little more since the electrical guy is coming tomorrow. Notice the perfect location of the fuse box! This will be saving me money since the electrician won’t have to run a bunch of wire for my kiln outlet.
One of the things I had to keep in mind was permanence- or lack thereof. Being married to a military man means we move every few years and this means my studio has to be easily dismantled and the space goes back to the way it was since this is a rental home.
My contractor should be making my tables and ventilation box this evening w/ set-up scheduled sometime tomorrow. We have a plan for ventilation since I’m sure you noticed there’s no windows..hopefully it’s easily set up as we planned.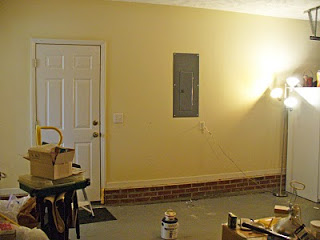
To be continued..
Moooo-vin’ on Up
I heart Moo products, they always make my work look even better. The business cards go into each package getting sent out and anything over $50 gets a postcard, too, since they’ve gone over pretty well.
Have a Happy Easter, everyone! 
 I hope to start taking progress shots of my studio getting put together since my contractor guy is going to give me an estimate and hopefully get started next week. Yahoo!
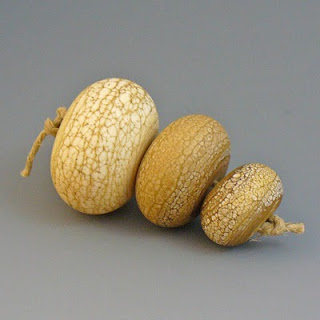
Big Daddy
The last few times at the torch I’ve been trying to work small, as you can see the smallest hollow bead is approx. 11x16mm. As customers keep asking if they could get smaller hollows, I thought it couldn’t be too hard to make them smaller…Yesterday, I couldn’t take it anymore and my hands decided to try and make the biggest hollow yet- it measures in at 37x49mm, which is nearly 2 inches across. And this made me think what else I could make bigger- smaller sculptural focals, perhaps? Who knows, the big daddy took me more than 30 minutes on my Minor torch and it was a decidely delicate dance keeping it warm enough. It’s always nice to feel my creativity start to percolate and see new possibilities. 


