Uncategorized

Clasp Disaster

My copper clay bracelet that I was so excited about finished firing late last night and I let it cool overnight w/ the lid off and checked on it this morning. While trying it on, the clasp broke since apparently the metal didn’t sinter properly.

I really tried to like this clay but it’s getting on my nerves. Once I use up what I have left I’ll probably just switch to COPPRclay- once it gets here, of course.
In an effort to make lemonade from lemons, I decided to put hinges on the part that broke off in the hope that it will be easier to put on. It’s drying right now and I hope I was able to affix the new clay to the old.

Copper Clay Bracelet

This bracelet has been weighing on my mind for a week now and I finally made myself finish it and get it cleaned up.

Just ignore those scorch marks on the left piece, it seems my warmer gets a little too hot and almost toasted my card on which was resting my link. I was too impatient to let it air dry since I was finally in the mood and free time is rare w/ a 9 and a half month old to corral.
There are things I have learned for next time- such as trying to avoid the warpage factor when drying since this makes it difficult to get the hinges to line up correctly. Especially when the links themselves have a curve. Guess I should’ve made a list earlier while I was working- I seem to have forgotten the others..
I am excited to try making my own tubes w/ the Makin’s extruder, oh, the time that will be saved, lol. ‘Cause I’m all about saving time as the girls from class can attest. Hadar showed us her bag o’ tubes that can be cut to size for hinges or bails- very smart, I say.
Speaking of smart, Hadar also mentioned how it’s a good idea to number your links when you’re working so you can make your hinges fit correctly.

Ah, I just remembered another thing for next time…make sure the clasp is on straight!

These pieces are in the kiln right now and lordy, lordy I hope they fire ok- keeping my fingers crossed.

Hadar’s class was fabulous and realized how nice it would be to have my own Makin’s Professional Clay Extruder with an adapter to make TUBES! 
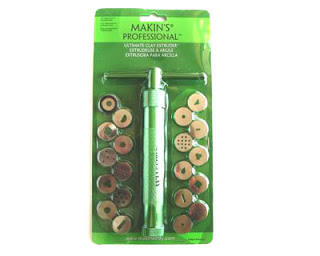
How ingenious- and time saving. I bought mine from Whole Lotta Whimsy since Michaels didn’t carry it..so much for that 40% off coupon. What I did find at Michaels were those leeetle clothes pins that can hold your clay together for you. They were in the wood/dollhouse section, and I also found some round wooden beads I plan to use as molds.

My pieces that I worked on last week need some finishing before firing and I’ve just been putting it off since that’s the part I hate the most. Meh.

Since it was a bit of a drive for me- about 2 and a half hours due to traffic- I wanted to cram as much as possible into the class. I managed to get two bracelets and a pair of earrings using 3 different hinging styles put together. Hadar had a smorgasborg of treasures – earrings, bracelets, necklaces, etc. that you could use as inspiration and examples. Her work is beautiful and intricate- the perspective view pendants were mind-boggling.

Now to just make myself take the time to finish those pieces-I suppose I could blame it on my little little man..nah.

Anticipation!

Tomorrow I get to take Hadar’s class about metal clay and hopefully will get over my fear of -*gulp*- hinges. The other benefits of taking a class is meeting new people and seeing those you already know- yahoo, Beady Gals!
I haven’t gotten nearly as much done this week in preparation for the class as I had hoped due to my son’s surgery on Monday at the children’s hospital at Stanford. What a wonderful place with great staff and doctors.
Now to finish finalizing my list since I’m prone to forget important things..

Computer Crash and Teething Nightmares

It’s hard to believe that we’ve been back from visiting family for a week and a half already. Could be that my time has been sucked away by an active and seriously teething baby.
Now we have to worry that all of our pictures and information may have been lost in a computer crash last night. Keeping my fingers crossed that it is something fixable.
If I could only find my beadmaking mojo- maybe once this current drama has passed over, my mojo will return.

Amazing Technicolor Bronzclay

The color from this batch had me thinking of the Amazing Technicolor Coat- only for Bronzclay. There were some unfortunate mistakes on my part, as you can see some bubbles/blisters- I don’t recall leaving any air trapped between layers, guess I’ll have to be more vigilant next time. Or it could be the temp. now that I think of it- I forgot to lower my kiln by 5 degrees like I normally do..could this be the culprit for my beads’ wart-like appearance? The leaf pendant has that amazing color on the front and back. I placed it on the very bottom and middle of the firing chamber- et voila!
As always, after my firing is done I try and get out to the studio to crack the lid slightly to let the heat escape until the inside reaches 1000*. Then I take the lid off of the kiln and let it continue to cool- this is also the point that I normally take the lid off the firing chamber, but I left it on this time. Before, I would wait until the interior reached 600* and would remove the chamber w/ my pieces -carefully!- and let it continue to cool for a few minutes before sifting the pieces from the charcoal.
This morning I was distracted and sorta forgot about the bronzclay after I took the kiln lid off and the interior read around 285* when I got back to it. When I took the lid off the chamber, I set it on my kiln lid and left it too cool to room temp. since I was feeding my son. And these were the colors I had after I sifted them from the charcoal!

Bronzclay Textured Hollow Forms

Today, I made a dent in my pile of hollow forms that needs to be textured. Focusing on the smaller pieces made it seem a little more manageable, they’re in the kiln right now and hope to have a nice batch of beads in the morning ready to be made into a bracelet or earrings.

Maybe I managed to get so much done today in an effort to avoid having to pack for my trip to Indiana on Wednesday. Grr, how I dread doing the airport and flying shuffle w/ a baby. Here’s to a smooth and uneventful travel day.

Success with Copper Clay

I finally had success with Hadar’s Copper Clay- this time I made sure to follow her new firing schedule to the letter that she posted on her blog. This is just a quick pic of my small pile of copper clay beads- a couple are from a friend that wasn’t too scared to let me try and fire them for her.
Now I may cook up the other pieces that I was too scared to take a chance of ruining.

Practicing Hollow Forms

Hadar’s books are fun to flip thru and my hands are itching to try some of the techniques. The one I’m currently focused on is hollow forms- how addictive!

There is approx. 165 grams, dry weight, alltogether in the big pile. The bigger pieces weigh in at about 115 grams, dry weight. The reason I list dry weight is the clay is premixed, which means moisture that will dry out and leave the piece a littttle bit lighter. I probably used a whole 200 gr. package and sanded quite a bit away to get the shapes refined.
Now I just have to decide how I want to decorate them…

Retooling

I was about to throw out an empty Pringles can when I realized this may be a perfect tool for bangles! Since closed circles don’t shrink (hardly at all) in Bronzclay, maybe this will save time and effort. It was covered in press’n’seal Glad saran wrap carefully so there weren’t any wrinkles. The top had a slight lip that would impede release so that had to be cut- et voila!- a cheap-o bangle/bracelet shaper. Now I’m on the look out for things in other sizes that can be used as molds, etc..
Hopefully up later, more bronzclay beads. The kiln is running and I’m looking forward to what comes out.